Amazon Beanstalk PHP hosting & database versioning for SaaS
This is part two of 3 posts that I intend to write about getting a SaaS app + site built from scratch. If you haven’t already, then you should read part 1 about creating a PHP SaaS app. In this part we will talk about 2 things:
1. Database versioning
2. Hosting, Database & DNS
Part 1: Database versioning
In the first part, we discuss about creating separate databases for every client. Now the problem is that these databases are empty and we need to fill them with some basic data + schema. The problem of creating this in the site code, is when you update your schema, you will have to manually update all the databases. This can be extremely tedious and difficult to achieve.
Thus to solve this problem, we assume our DB is empty. Then we create our version 1 of the schema and save it as db/1.sql. This will be our base i.e. when the user first visits the client’s site, it will run this SQL to create the require schema. Next version will be 2.sql (which may add/drop tables etc.) and so on.
In our app configuration file, we will add a variable (somewhere at the top) and set it to the latest schema version.
$currentdbversion = 5;
Then after the DB connection, we will add the following code:
...

mysql_selectdb(DB_NAME,$dbh);

// Success! Now we can continue to use the app as-is!

$sql = ("select * from cometchat_settings where name = 'dbversion'");
$appsettings = mysql_fetch_row($sql);

$dbversion = 0;

if (!empty($appsettings['value'])) {
   $dbversion = $appsettings['value'];
}

while ($dbversion < $currentdbversion) {
    $dbversion++;
    if (file_exists(dirname(__FILE__).'/db/'.($dbversion).'.php')) {
        include_once(dirname(__FILE__).'/db/'.($dbversion).'.php');
    }
}
In 1.sql, you can add your SQL queries, and add the bottom you will add:
<?php

$sql = ("CREATE TABLE  `app_settings` ( `name` varchar(255) NOT NULL,  `value` text NOT NULL, PRIMARY KEY  USING BTREE (`name`)) ENGINE=InnoDB DEFAULT CHARSET=utf8;");
$query = mysql_query($sql);

// Add other SQL queries

$sql = ("REPLACE INTO `app_settings` (name,value) values ('dbversion','1')");
$query = mysql_query($sql);
In 2.sql and all other SQL files, it will be:
<?php

// Add other SQL queries

$sql = ("REPLACE INTO `app_settings` (name,value) values ('dbversion','2')");
$query = mysql_query($sql);
So the workflow is as follows:
1. The site code only creates the DB. It does not populate the DB with any data/schema.
2. When the client visits the app for the first time, $dbversion is 0, so 1.sql is executed.
3. When you make changes to your SQL DB, you simply update $currentdbversion & add the $currentdbversion.sql file to the db folder
4. When the app is run the next time, it will check if the SQL dbversion is lower than $currentdbversion; if yes, it will run all the SQL files till it reaches the latest version.
Part 2: Hosting on Elastic Beanstalk
Hosting on Amazon’s Elastic Beanstalk is fairly simple.
Step 1
Signup for Amazon AWS and then go to “Elastic Beanstalk” and create a new application. Zip all your PHP code (for your app) and then attach it while creating:
Step 2
Enter a URL for your app; I have used “mydummyapp”.
Step 3
t1.micro is sufficient to begin with and will keep your costs low. Select it and then proceed with creation.
Step 4
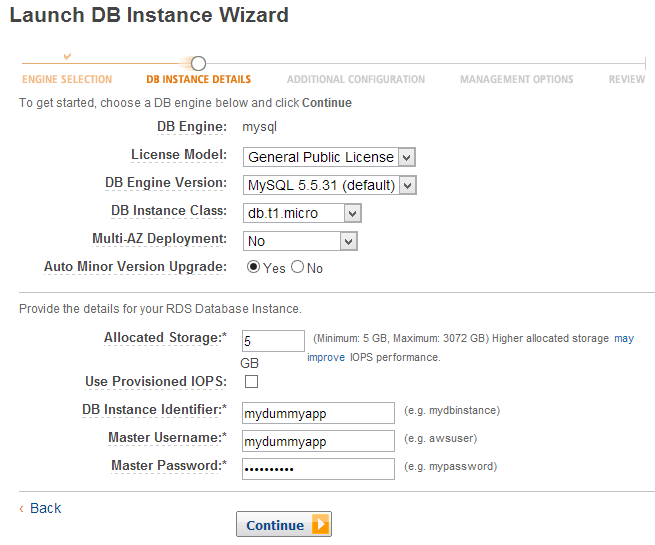
Go to “RDS”, “Launch new DB instance” and then create a new instance.
Step 5
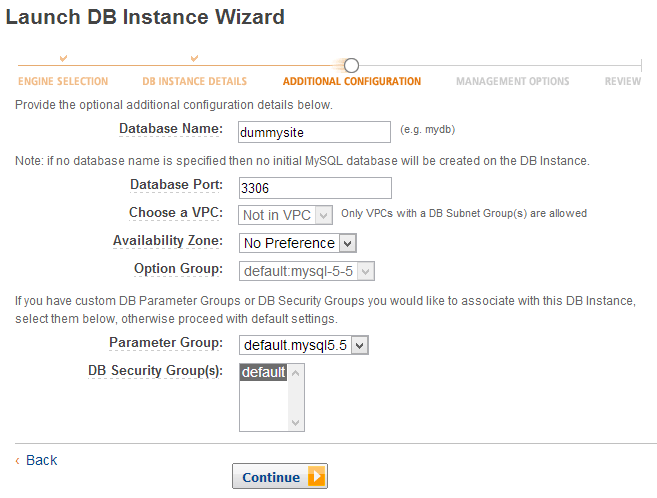
Create a DB for your site (which will be used to store all clients info). The client specific DBs will be created on the fly (in the same instance).
Once completed, add the connection details to your app and test if the connection is working fine. If you are unable to connect, then edit the “default” Security Group and add “CIDR/IP: 0.0.0.0/0”. This will allow you to connect to the instance from any IP. Later, you can modify this to only certain IPs.
Step 6
Go to “Route 53” and “Create Hosted Zone” and enter your domain URL. Then double click on the listing and then “Create Record Set”.
Once done, get the server IP for your site hosting (from Asmallorange/Rackspace/site-host) and two A records:
Finally, update your nameservers to point to those mentioned by Amazon.
Once this is done, you can visit http://mydummyapp.elasticbeanstalk.com and check your app. You can use any third-party host like Asmallorange or RackSpace to host your SaaS site. You do not need to use Amazon Beanstalk to host your SaaS site.
That’s all folks! Now you have successfully setup your server (Beanstalk), your DBs (RDS) and your DNS (Route 53). You should be now ready to start testing your app along with your site.
Where do we go from here?
We have achieved a lot using this tutorial (and part 1). We have setup our app, site and have configured Amazon’s services to host our app. In the next part, we will talk about scaling and other tips & tricks.
Discuss, Share & Subscribe
Do let me know your suggestions on how I can improve this tutorial. If you like what you are reading, then please help spread the word by re-tweeting, blogging and sharing this tutorial. Thank you.
To get a notification when the next part is ready, please subscribe using the form at the bottom of this page.


